

I took two pounds of ground beef and browned it.

While it was browning, I prepared the garlic. I just cut the bottom off.

And then peel back the garlic skin.

See, now they are naked cloves of garlic. I know I can just add the cloves skins and all to my nifty garlic press, but I prefer to skin the cloves because I get more garlic out of the press and less left behind in the press.

I add the garlic while the meat is still browning.

While I am working on the meat and garlic, Bill is helping out and grating the cheese for me. I detest grating cheese. I had to do it so many times growing up that I always pawn off cheese shredding to others. I usually buy the preshredded stuff, but it doesn't taste as yummy as freshly shredded cheese.

Open up two cans bean with bacon soup and dump them into a bowl. Do not reconstitute.

I take my inversion blender and blend one 16 ounce bottle of salsa. Nate doesn't care for chunks of tomatoes, so that is what made me think to blend the salsa.

Pour the salsa into the bowl with the bean soup and dump in 2 teaspoons of paprika.

In goes the 1/2 cup cornstarch, 2 teaspoons salt, and 1/2 teaspoons pepper.

Mix really well.

Rinse two 16 ounce cans kidney beans.

Pour them into the bean soup mixture and two 15 ounce cans black beans (that were also rinsed).

Mix well.

As you can tell, the bowl is different now. I did not estimate how much this filling would be making two pies, so I had to dump all the other filling stuff into this bowl and then add the rest of the ingredients: the ground beef, 2 1/2 cups shredded cheese, and 3/4 cup chopped green onions.

Mix all together. Look at all that yumminess waiting to be devoured!

You can make your own pie crust or you can buy pre-made ones. I chose pre-made ones because I only make pie crust when the mood strikes me - which is not very often. Even with the pre-made crusts, they still need to be rolled out a little bit.

Place into a pie pan.

Pour in the filling.

Top with another sheet of pie crust, flute edges, and cut slits in top. Bake in 425°F for 30-35 minutes.
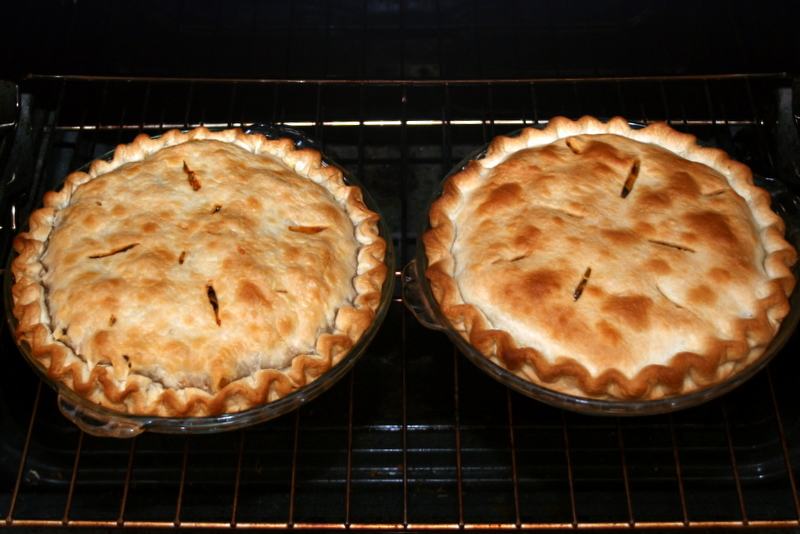
Look at my two pretty beef pies!! Now, I should note that the pie crust on the left is from Pillsbury and the crust on the right is from Great Value. It may look like the Great Value one baked better, but that is not so. When we tried each crust, the Pillsbury was the best because it was flaky. The Great Value one was kind of dry. Not what you want in a pie crust.

Up close of the Pillsbury crust. Mmmmm, look at that gorgeously browned fluted crust and flakiness of the crust.

Yes, the fluting is golden brown on the Great Value crust, but that was the best part.

Mmmmm, here is another 3/4 cup of diced green onions for the topping.

Ooooo, flaky goodness!

Ok, so this isn't the best picture, but I couldn't wait to tear into this. I added some sour cream, salsa, sliced olives, and more cheese on top. I found it rather delicious. I personally would make a few minor adjustments next time I make it: less bean with bacon soup, more cheese, and possible some cream cheese.
Now onto dessert: Brickle Drop Cookies. I made this from a Hershey's Holiday Favorites cookbook I bought at the register. (I love me some impulse cookbooks at cash registers!)
The recipe can be found here.

One cup granulated sugar and one cup of packed light brown sugar.

Two sticks softened butter

1 teaspoon vanilla extract

Blend together....

...until it looks like this.

3 eggs

Beat until it looks like this all nice and creamy.

Sift together: 3 ½ cups flour, 2 teaspoons baking soda, and 2 teaspoons cream of tartar. Then gradually add the flour mixture to butter mixture. Blend well.

Stir in 1 (8 ounce) package Heath Bits 'o Brickle Toffee Bits.

This dough is so lovely and tasted good just as is. 

Use a medium cookie scoop (about size 50 - capacity 1 ¼ tablespoons)

Place on parchment paper covered cookie sheet (I use Air-Bake cookie sheets). You can also use a Silpat but I don't have one of those, yet. (hint, hint... to my husband for a Christmas gift. I would like 4 please.)

Look at these adorable little balls of toffee-studded cookie dough! Bake in a preheated 350°F for 8-10 minutes or until slightly browned.

It wasn't until after I baked the first batch that I realized I forgot to adjust the original recipe for altitude changes (I live at an elevation of 5623 feet above sea level). So they are a little flatter than I would like. But they perfect for homemade ice cream sandwiches. Especially since it makes about 6 dozen.

As a self proclaimed chocoholic myself, I am surprised that I love these chocolate-free cookies. They are so yummy and the tiny toffee bits are delicious are crunchy bits of heaven.
No comments:
Post a Comment